一般來說在iOS系列產品只要同時按下Home+Power即可把螢幕快速擷取,擷取下來的圖片就會存在"相片"中(語言設定為英文即顯示"Photos"),是個相當好用的功能,但在程式中該如何快速擷取呢?以下就來講解一下
Download Example
首先來講擷取部份,先在.h檔內import#import <QuartzCore/QuartzCore.h>
再來到.m檔內設定一個按鈕來做擷取的動作,在此直接在viewDidLoad直接建立按鈕,當然也可以用IB等其他方式來做UIButton *myButton = [[UIButton alloc] initWithFrame:CGRectMake(10, 410, 140, 40)];
[myButton setBackgroundColor:[UIColor blackColor]];
[myButton setTitle:@"screen capture" forState:UIControlStateNormal];
[myButton addTarget:self action:@selector(capture) forControlEvents:UIControlEventTouchUpInside];
[self.view addSubview:myButton];
[myButton release];
接著把"capture"這個function也建立出來-(IBAction) capture{
UIGraphicsBeginImageContext(self.view.bounds.size);
[self.view.layer renderInContext:UIGraphicsGetCurrentContext()];
UIImage *viewImage = UIGraphicsGetImageFromCurrentImageContext();
UIGraphicsEndImageContext();
UIImageWriteToSavedPhotosAlbum(viewImage, nil, nil, nil);
//NSLog(@"viewImage = %@",viewImage);
}
到這可以build看看是否可以順利Run,按下按鈕會自動把畫面儲存至"相片"內,重點來了,可是這樣很麻煩,還要關掉app跑去"相片"看,為了懶總是要把這問題解決
目前作法是,畫面中一張圖兩個按鈕,一個按鈕擷取螢幕,另一個連結至"相片",並且相片選取後可以丟到畫面中的圖片位置,先把剛剛的.h檔改為#import <UIKit/UIKit.h>
#import <QuartzCore/QuartzCore.h>
@interface screenCaptureViewController : UIViewController
UIImagePickerController *imagePicker;
UIImageView *imageView;
}
@property (nonatomic, retain) UIImagePickerController *imagePicker;
@end
再來到.m檔部份,首先在@implementation與@end中間加入這行,將UIImagePickerController用property來管理記憶體@synthesize imagePicker;
接著在viewDidLoad內加入//set image
imageView = [[UIImageView alloc] initWithFrame:CGRectMake(0, 0, 320, 400)];
[imageView setBackgroundColor:[UIColor blackColor]];
[self.view addSubview:imageView];
//set screen capture button
UIButton *myButton = [[UIButton alloc] initWithFrame:CGRectMake(10, 410, 140, 40)];
 [myButton setBackgroundColor:[UIColor blackColor]];
 [myButton setTitle:@"screen capture" forState:UIControlStateNormal];
 [myButton addTarget:self action:@selector(capture) forControlEvents:UIControlEventTouchUpInside];
 [self.view addSubview:myButton];
 [myButton release];
//set choose photo button
UIButton *myButton2 = [[UIButton alloc] initWithFrame:CGRectMake(170, 410, 140, 40)];
[myButton2 setBackgroundColor:[UIColor blackColor]];
[myButton2 setTitle:@"choose photo" forState:UIControlStateNormal];
[myButton2 addTarget:self action:@selector(gallery) forControlEvents:UIControlEventTouchUpInside];
[self.view addSubview:myButton2];
[myButton2 release];
//set image picker
imagePicker = [[UIImagePickerController alloc] init];
imagePicker.delegate = self;
imagePicker.sourceType = UIImagePickerControllerSourceTypePhotoLibrary;
[self.view setBackgroundColor:[UIColor whiteColor]];
然後在@implementation與@end中間加入這兩個function&delegate-(IBAction) capture{
UIGraphicsBeginImageContext(self.view.bounds.size);
[self.view.layer renderInContext:UIGraphicsGetCurrentContext()];
UIImage *viewImage = UIGraphicsGetImageFromCurrentImageContext();
UIGraphicsEndImageContext();
UIImageWriteToSavedPhotosAlbum(viewImage, nil, nil, nil);
//NSLog(@"viewImage = %@",viewImage);
}
-(IBAction) gallery{
[self presentModalViewController:self.imagePicker animated:YES];
}
- (void)imagePickerController:(UIImagePickerController *)picker didFinishPickingImage:(UIImage *)img editingInfo:(NSDictionary *)editInfo {
imageView.image = img;
[[picker parentViewController] dismissModalViewControllerAnimated:YES];
}
最後請記得在dealloc把imageView給釋放掉- (void)dealloc {
[imageView release];
[super dealloc];
}
完成後build起來畫面應該是如下,可以按下screen capture來擷取畫面...不過我懶得寫個alert來提示
點下choose photo
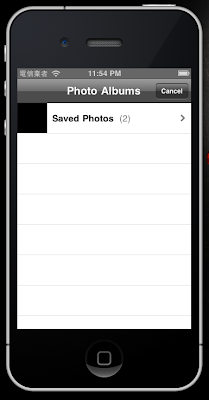
點入相簿內
選取所擷取的畫面就會切回來並且把上面黑色那塊換掉
多用幾次就會變成這樣
Download Example
相關連結
iOS Developer Library
iOS Developer Library - UIImagePickerController Class Reference
iOS screen capture & UIImagePickerController 快速擷取螢幕&取得相片圖檔
by Isken Huang - 12/02/2010 - iOS
訂閱:
張貼留言 (Atom)


沒有留言:
張貼留言